 I suggest that you make a copy of the layout diagram that is included in the pattern. Before you all gasp and fall over dead that I suggested that you make a copy, this kind of copy is ok. It is for your own personal use. I’m not telling you to make a copy to sell or give away or in some way deprive the designer of her rightful fee. I’m telling you to make a copy of the layout diagram that you can mark-up, color, scribble on, without destroying your original pattern. That is perfectly OK.
Now you have to arrange your squares the way you would like to see them in the quilt. For this queen size project that layout would be massive. It would require my substantial design wall and then some. Instead, I arrange just one of the squares from each design element. Each square on the wall represents 4 pieces. They are arranged every-other-one because a grey background square goes in between each design element, but I see no reason to put them on the wall, I know where they go.
As you can see from the top corner, the rows will be assembled diagonally, so that is the way I choose to make the blocks. Instead of making all of the blocks before I start sewing them together row-by-row and cut them into shape as I go. When I have finished an entire row of blocks, I sew them together and add it to the body of the quilt.

This requires that all of those “layout” squares have to stay on my design wall until I finish putting this top together. I can’t layout anything new until I’ve finished piecing the JJ top! I need to get this one off the wall so that I can get this one ON the wall!
Make the 4 patch blocks using 2 squares of background fabric and 2 squares of print (from adjacent design units). This is where the copy of the layout comes in handy!
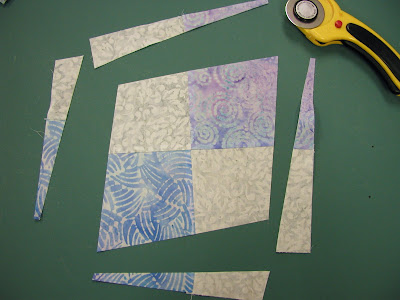
Press the 4 patch. Place the ruler over the block and align the lines printed on the ruler with your seam lines. Trim all 4 sides.
This block has the color on the “pointy” ends. The next block in the diagonal row will have the background on the pointy ends.
 The pieces at the beginning and end of the row don’t have to be full blocks. They will be cut in half, so I only use 3 squares when I assemble them.
The center of this quilt will be 8 units by 11 units, that’s 88 blue blocks and 70+ background blocks… I better get sewing!
Press the 4 patch. Place the ruler over the block and align the lines printed on the ruler with your seam lines. Trim all 4 sides.
This block has the color on the “pointy” ends. The next block in the diagonal row will have the background on the pointy ends.
 The pieces at the beginning and end of the row don’t have to be full blocks. They will be cut in half, so I only use 3 squares when I assemble them.
The center of this quilt will be 8 units by 11 units, that’s 88 blue blocks and 70+ background blocks… I better get sewing!


1 comment:
Hi, Nice blog it really impressed me a lot. Visit back my site.
Post a Comment